Adding the Graphics
Now that you have a basic framework going, you can get on with the task of creating the graphics for the game. The first thing you'll cover is a rendering technique known as double buffering; after that, you'll move on to drawing the game world.
Double Buffering
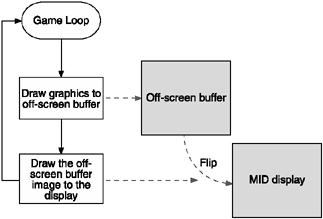
As you saw in reviewing the MIDP APIs, rendering graphics generally just involves adding code to the paint method. You grab a graphics context and draw on the display. Unfortunately, if you're doing this through a high-speed game loop (as you did earlier), you'll run into some ugly display issues. The problem is something like holding a stage play with no curtainyou need time to get everything ready before you open the curtain and let everyone take a peek. It's the same with your MIDyou need to prepare everything off-screen and, when you're ready, render it in one go.
To create this process you need to add another area, or buffer, where you can safely render off-screen. You then have two buffersone on-screen, representing what you last rendered, and one off-screen, to which you can render anytime. That's why you call this double-buffering. You can see this process illustrated in Figure 7.4.
Figure 7.4. To eliminate drawing process artifacts, you render to an off-screen buffer and then draw the entire screen to the display in one quick step.

To add double buffering to RoadRun, you need to initialize an off-screen buffer. I do this using a resource setup method called from the constructor.
private Image offScreenBuffer;

public GameScreen()
{
   …

   initResources();
}

private void initResources()
{
   offScreenBuffer = Image.createImage(getWidth(), getHeight());
}
You also need to modify the paint process to render your off-screen buffer. You'll notice that in the following code, I've also added another method called renderWorld. You'll get to that one in the next section.
protected void paint(Graphics graphics)
{
   renderWorld();
   graphics.drawImage(offScreenBuffer, 0, 0, Graphics.LEFT | Graphics.TOP);
}
Drawing the World
Drawing the world is a relatively painless process. You just use the built-in vector drawing tools to render a simple version of the freeway. Because you're using vector-based drawing to set up the world, you can be a little more flexible about how the world is drawn. This starts with the idea that the lane height (the vertical distance between each lane) is the primary unit for rendering the entire level. As you saw in Figure 7.1, you need three curbs (top, middle, and bottom), six lanes (three at the top and three at the bottom), and space for the status bar along the bottom.
To space things out well, you set the status bar to a static height of 10 pixels. (This is generally a good size for the small font.) laneHeight is then calculated inside the initResources method as the height of the display minus the status bar divided by 9 (three curbs and six lanes. Because you only need to calculate these numbers once, the code to carry this out belongs in the initResources method.
private static int statusLineHeight=10;
private int laneHeight=0;
private static final int topMargin = 3;

private void initResources()
{
   …
   // set up our world variables
   int heightMinusStatus = getHeight() - statusLineHeight;
   laneHeight = ((heightMinusStatus) / 9);
}
Once you have things set up, you can add the renderWorld method to create your expressway.
private void renderWorld()
{
   // grab our off-screen graphics context
   Graphics osg = offScreenBuffer.getGraphics();
   int y=0;

   // draw the top roadside
   osg.setColor(0x00209020);
   y += (laneHeight)+topMargin;
   osg.fillRect(0, 0, getWidth(), y);

   // curb edge
   osg.setColor(0x00808080);
   osg.drawLine(0, y-2, getWidth(), y-2);
   osg.setColor(0x00000000);
   osg.drawLine(0, y-1, getWidth(), y-1);

   // draw the first three lanes
   osg.setColor(0x00000000);
   osg.fillRect(0, y, getWidth(), laneHeight * 3);

   // draw the line markings on the road
   osg.setStrokeStyle(Graphics.DOTTED);
   osg.setColor(0x00AAAAAA);
   y += laneHeight; osg.drawLine(0, y, getWidth(), y);
   y += laneHeight; osg.drawLine(0, y, getWidth(), y);
   y += laneHeight; osg.drawLine(0, y, getWidth(), y);

   // draw the middle safety strip
   osg.setColor(0x00666666);
   osg.fillRect(0, y-2, getWidth(), 2);
   osg.setColor(0x00aaaaaa);
   osg.fillRect(0, y, getWidth(), laneHeight); y+= laneHeight;
   osg.setColor(0x00666666);
   osg.fillRect(0, y - 2, getWidth(), 2);

   // draw the next three lanes
   osg.setColor(0x00000000);
   osg.fillRect(0, y, getWidth(), laneHeight * 3);

   // draw the line markings on the road
   osg.setStrokeStyle(Graphics.DOTTED);
   osg.setColor(0x00AAAAAA);
   y += laneHeight; osg.drawLine(0, y, getWidth(), y);
   y += laneHeight; osg.drawLine(0, y, getWidth(), y);
   y += laneHeight; osg.drawLine(0, y, getWidth(), y);

   // curb edge
   osg.setStrokeStyle(Graphics.SOLID);
   osg.setColor(0x00808080);
   osg.drawLine(0, y, getWidth(), y);
   y++;
   osg.setColor(0x00000000);
   osg.drawLine(0, y, getWidth(), y);

   // draw the bottom roadside
   osg.setColor(0x00209020);
   osg.fillRect(0, y, getWidth(), y + (laneHeight * 2));
   y += laneHeight * 2;

   // draw the status bar along the bottom
   osg.setColor(0, 0, 128);
   osg.fillRect(0, getHeight() - statusLineHeight, getWidth(), getHeight());
   osg.setFont(Font.getFont(Font.FACE_PROPORTIONAL, Font.STYLE_PLAIN, Font.SIZE_SMALL));
   osg.setColor(0x00ffffff);
   osg.setColor(0x00ffffff);
   osg.drawString("" + cps + " cps", 5, getHeight() - statusLineHeight + 1,
                   Graphics.LEFT | Graphics.TOP);
}
/**
 * @return The height of a lane.
 */
public int getLaneHeight()
{
   return laneHeight;
}
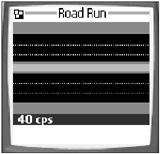
I know that's a lot of code, but it's nothing you haven't seen already. Take note, however, that you're doing all your drawing to the off-screen buffer's Graphics context, not to the screen. I've also moved the CPS rate-drawing code out of the paint method and onto the status bar rendered at the bottom of the screen. Figure 7.5 shows the results.
Figure 7.5. Not bad for a little bit of drawing code!

Linking to the Application
The next step for GameScreen is to integrate it into the application class. If you remember back when you created the menu form, there was a call to an "international method of mystery" named activateGameScreen. Now that you have the GameScreen ready, integrate it with RoadRun and implement the activate method.
public class RoadRun extends MIDlet
{
  …

   private GameScreen gameScreen;

   …
   public void activateGameScreen()
   {
      gameScreen = new GameScreen(this);
      Display.getDisplay(this).setCurrent(gameScreen);
   }
With GameScreen now integrated with the application, your stage is set. Let's go hire some actors!