Baking Some MIDlets!
Yes, that's rightafter that big, long (but incredibly interesting, right?) introduction, you're finally ready to actually code something!
First make a place to store your project by creating a directory called projects within the j2me home. Create a subdirectory within the projects directory called hello. (Feel free to use alternative names if you want; just substitute your choice in any of the examples.)
Okay, you're not going to set the world on fire with your first MIDlet, but at least you'll get to say hello to the micro world. The code for your first MIDlet follows. Create a file named hello.java to contain this code. This code is also available on the CD under the source code for Chapter 4.
import javax.microedition.midlet.MIDletStateChangeException;
import javax.microedition.lcdui.*;
/**
  * A simple example that demonstrates the basic structure of a MIDlet
  * by creating a Form object containing the string "Hello, Micro World!"
  *
  * @author Martin J. Wells
  */

public class Hello extends javax.microedition.midlet.MIDlet
       implements CommandListener
{
   protected Form form;
   protected Command quit;

   /**
    * Constructor for the MIDlet which instantiates the Form object and
    * then adds a text message. It then sets up a command listener so it
    * will get called back when the user hits the quit command. Note that this
    * Form is not activated (displayed) until the startApp method is called.
    */
   public Hello()
   {
      // create a form and add our components
      form = new Form("My Midlet");
      form.append("Hello, Micro World!");

      // create a way to quit
      form.setCommandListener(this);
      quit = new Command("Quit", Command.SCREEN, 1);
      form.addCommand(quit);
   }

   /**
    * Called by the Application Manager when the MIDlet is starting or resuming
    * after being paused. In this example it acquires the current Display object
    * and uses it to set the Form object created in the MIDlet constructor as
    * the active Screen to display.
    * @throws MIDletStateChangeException
    */
   protected void startApp() throws MIDletStateChangeException
   {
      // display our form
      Display.getDisplay(this).setCurrent(form);
   }

   /**
    * Called by the MID's Application Manager to pause the MIDlet. A good
    * example of this is when the user receives an incoming phone call while
    * playing your game. When they're done the Application Manager will call
    * startApp to resume. For this example we don't need to do anything.
    */
   protected void pauseApp()
   {
   }

   /**
    * Called by the MID's Application Manager when the MIDlet is about to
    * be destroyed (removed from memory). You should take this as an opportunity
    * to clear up any resources and save the game. For this example we don't need

    * to do anything.
    * @param unconditional if false you have the option of throwing a
    * MIDletStateChangeException to abort the destruction process.

    * @throws MIDletStateChangeException
    */
   protected void destroyApp(boolean unconditional)
            throws MIDletStateChangeException
   {
   }

   /**
    * The CommandListener interface method called when the user executes
    * a Command, in this case it can only be the quit command we created in the

    * constructor and added to the Form.
    * @param command
    * @param displayable
    */
   public void commandAction(Command command, Displayable displayable)
   {
      // check for our quit command and act accordingly
      try
      {
         if (command == quit)
         {
            destroyApp(true);
            // tell the Application Manager we're exiting
            notifyDestroyed();
         }
      }

      // we catch this even though there's no chance it will be thrown
      // since we called destroyApp with unconditional set to true.
      catch (MIDletStateChangeException me)
      { }
   }
}
Don't worry too much about the details of this example. I should point out, though, that I have not kept things simple. This first MIDlet contains quite a few components, all of which you'll explore soon. For now, I want to just rush blindly on to making something work.
Compiling Your Application
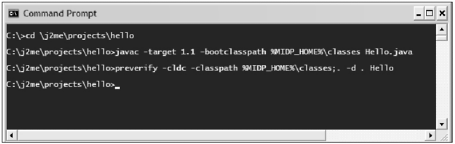
The next step is to compile your application. To prepare for this, open a shell and change to your project's directory by entering cd \j2me\projects\hello. To start compiling, enter javac -target 1.1 -bootclasspath %MIDP_HOME%\classes Hello.java.
If you've entered everything correctly, the compiler will generate a class file named Hello.class for your program. Feel free to use the dir command to check out the results.
Before you move on, take a quick look at the options used to compile because they're a little bit different than what you might typically use.
The -target 1.1 is there due to a known issue when using JDK 1.4 and the MIDP preverify tool. If you compile normally, you see a Class loading error: Illegal constant pool index error when you attempt to preverify later. To avoid this, you force the Java compiler to output class files in the older 1.1 version format. If you're using a version of the MIDP later than 1.0.3, feel free to give things a go without this option.
The -bootclasspath %MIDP_HOME%\classes argument forces the compiler to use only the classes in the MIDP classes directory, which contains the core MIDP and CLDC class files. This ensures that what you're compiling is compatible with the intended run-time target.
Preverifying Your Class File
The next step is to preverify the class file. Enter preverify -cldc -classpath %MIDP_HOME%\classes;. -d . Hello. Although this looks complicated, it is a relatively simple command. First, the -cldc option checks to see that you're not using any language features not supported by the CLDC, such as floating points or finalizers.
The classpath is pretty self explanatory; it should point to both the MIDP class library and the location of your project class files. The -d sets the destination directory for the resulting post-verified class files. For now, you'll just overwrite your original class files with the new ones. Later you'll look at better ways of handling this. The final argument is the name of the class you wish to preverify.
Figure 4.7 shows an example of the complete build process.
Figure 4.7. The output from building our demo MIDlet.
Running Your MIDlet
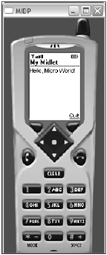
Phew, you're almost there! Now that you have a compiled, preverified class file, all you need to do is see the results in action. The simplest way to view a MIDlet is to use the MIDP RI emulator. You can access this straight from the shell using the command midp -class-path . Hello.
You should then see the MIDP emulator window with your MIDlet running inside it, as shown in Figure 4.8.
Figure 4.8. Our hello world MIDlet running in the default Sun emulator.
Okay, now stand up, make sure nobody is watching, and give yourself a big high-fivedon't ask me how you actually do that. You, my learned friend, have made your first MIDlet!
When you've calmed down enough to continue, move on to the topic of packaging your little wonder.