Sprite Basics
As an action game, Star Assault depends heavily on graphics as the primary feedback mechanism for the player. You'll need to draw level tiles, the player's ship, enemy units, and those cool-looking explosions. To bring these to life requires more than just drawing simple images; what you need are sprites!
Sprites are collections of images (or frames) that represent all of the various states of a graphical entity. When the game is running, you quickly switch between these frames to give the illusion of animation.
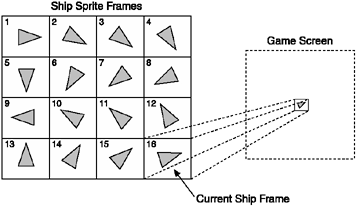
The ship the player controls in Star Assault is a good example of a sprite. As you can see in Figure 9.1, you use 16 frames to represent the directions the ship can face. As the player turns the ship (using the arrow keys), you quickly change the onscreen image to represent the direction the ship object is facing, thus giving the illusion the ship is actually turning.
Figure 9.1. The ship sprite has 16 frames to represent all the directions it can face in the game.
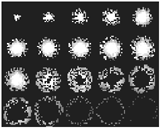
Another good example of a sprite is the explosion you'll display when an enemy or the player is defeated. To display the explosion, you use a sequence of 20 frames, each one representing one part of the total animation. When you play back these images in sequence, it gives the illusion of a blast and then a slowly dissipating smoke cloud. Figure 9.2 shows the actual frames for the full explosion animation.
Figure 9.2. The 20 frames that make up your explosion animation
So how do you go about making your own sprites? First you need to obtain some source material in the form of image files.
Preparing Graphics
Regardless of whether someone else creates the graphics for your project or you do them yourself, you will have to format the source images into something you can conveniently load for your sprites. The next few sections will show you how to do this.
Layout
Firstly, MIDP uses the PNG image file format for all graphics, so you (or the artists, if you can convince them) will need to use a 2D graphics application to lay out and save your images using this format. I use Adobe Photoshop, although other applications such as Jasc's Paint Shop Pro and GIMP on Linux are just as good. (They may be even better by now; I'm stuck on Photoshop out of habit.)
Using your graphics program, you should then create a single image file and lay out all the frames of your sprites in even rows and columns (to line things up use the grid and guideline tools in your graphics application). Try to keep things in even rows so you don't end up with any blank areas in your image and waste image file space. As you saw in Figure 9.2, I arranged the explosion sprite frames into four rows of five frames each.
NOTE
Tip
Images are expensive in terms of both JAR space and heap (when they are decompressed into memory), so try to reduce the number and size of images as much as possible. Consider reusing all or part of some graphics for other elements in your game. (You'll be surprised how reusable some graphics can be.) You should also try to reduce the total number of frames used for animations; MIDs typically don't need very many anyway. The 20-frame explosion animation illustrated in Figure 9.2 looks perfectly fine with eight frames, and even quite passable with four frames.
Saving Header Space
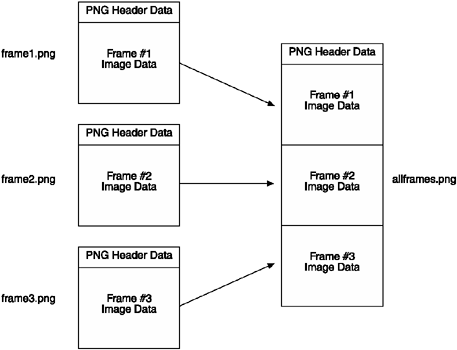
There's an added bonus to merging all the frames of a sprite into a single image file. PNG files, like most graphical formats, require a minimum amount of space, known as a header, before you store any image data. With PNGs, this required space is around 200 bytes. That might not sound like much now, but as you can see in Figure 9.3, if you multiply that by every frame, for every state of every sprite, it can quickly turn into a great deal of wasted JAR space.
Figure 9.3. Individual images (left) each include a header which is not required when combined (right).
Not Saving Header Space
Now that you're undoubtedly convinced you should merge every image into one giant PNG, I should tell you about the drawbacks of doing so. The most significant effect is something you're undoubtedly already very familiar withpaletificatalisation.
Had trouble with that one, didn't you? All right, I admit itthat's not really a word. I just made it up. (Wow, maybe it'll catch on …in Tibet.) Anyway, paletificatalisation is just my term for the effects of merging images. To understand this concept, you first need to know that the level of compression you can achieve using the PNG format is closely tied to the size of the palette your image has (in other words, the number of unique colors it uses). The wider the variety of colors, the more space every pixel takes. It follows, therefore, that you can keep the size of PNG files down by storing images of similar color. This is great for most sprite frames, which tend to use a very similar palette, but if you use a single image file with separate sections for many colors, you're likely to end up increasing the total image size due to the larger palette required to represent all your images.
NOTE
Tip
You can achieve very high compression rates using the PNG image format. Most graphics programs will provide options when you save the file. To reduce the file size, try using an 8-bit color format (PNG-8 instead of PNG-24), disabling dithering, and, if possible, reducing the palette size. (You'll be surprised how few colors you really need in an image.) You should also always turn off interlacing, which is pointless on MIDs, and disable transparency if you're targeting a device that doesn't support it.
To optimize properly, you often need to have different versions of PNG files for different MID builds. Unfortunately, this can become very confusing due to the large numbers of different image files you need to manage. To help you with this, you'll look at using an automated build system in Chapter 14, "The Device Ports."
Optimizing your PNG files can typically save you 50 to 80 percent in terms of file size when compared to the typical default save options, so it's worth spending some time tweaking the settings. However, keep in mind that this saves JAR space, not heap memory.When the image is later loaded into memory, it will decompress to the same size regardless of how much you optimized it. How much heap it will take depends on the phone.
Image Colors
MIDs typically use a much lower color depth (12-bit or less) than PCs (24-bit). If your artists jump at the horror of this, just tell them to load an image on a phone screen and try to spot the difference in a 12-bit image file. I'll bet you they can't do it.
Unfortunately, there's no 12-bit default palette you can load in your graphics program to simulate how the image will actually look on a MID. The only way to do this is to load the image on the actual device and find out for real. As you'll see, though, the translation of your image palette when it is displayed on a particular phone doesn't have much of an impact anyway. The screens are just too small to notice fine-grained color differences.
I recommend that you use very strong, very bright colors. MIDs will wash out what looks like a bright image on a PC, so pump up the contrast and brightness to make things really stand out.
NOTE
Tip
If you're really after every inch of space in an image file, one technique is to reduce your palette by merging similar colors. Many advanced graphics applications have tools to assist with this process. You'd be surprised how many colors you can merge without a noticeable impact on the presentation of an image.
Loading the Images
Next I want to work through how to load up the frames of your sprite using the MIDP graphics tools. Figure 9.4 shows the image file containing the frames for the player ship, enemy fighter (the red one), and enemy turrets. This file also includes the four frames for the shielding animation.
Figure 9.4. The frames for the player's ship as well as two enemy types laid out in a single image.
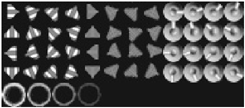
The two ships and the turret each have 16 frames, arranged in a 4 x 4 layout. Each frame is 16 x 16 pixels. The shield frames, however, are 4 frames, each 20 x 20 pixels. (This is so they poke out of the edges when drawn underneath the ship spritesit's a pretty good-looking effect, actually, but I'll get to that later.)
Extracting the Image
To use these images in your game, you need to extract only the portion of the image that contains the frames you want. First, you load the entire image from the file:
Image fileImage = null;
try
{
      fileImage = Image.createImage(filename);
}

catch (IOException ioe)
{
      System.out.println("can't load file: " + filename);
}
Your problem now is how to extract just the portion of the image you want. As you can see in Figure 9.5, if you want to create an image containing only the shield frames, you need to exclude everything else in the file. The area you want is below the 16 frames for the player's ship, so you need to start 64 pixels down and then grab a portion of the image 80 pixels across (4 x 20 pixels for each shield frame) and 20 pixels down.
Figure 9.5. You need to extract only the part of the greater image that contains your frames.

Here's a good question: How can you extract only a part of a larger image (in your case, the 20 x 80 pixel shield frames)? MIDP does not support any method to draw only part of an image. To do this, you need to use a little drawing trickery. Here's the code:
/**
 * Extracts a portion of an image using clipping.
 * @param source The source image.
 * @param x The starting x position of the clipping rectangle.
 * @param y The starting y position of the clipping rectangle.
 * @param width The width of the clipping rectangle.
 * @param height The height of the clipping rectangle.
 * @return A new Image object containing only the portion of the image
 * withing the x, y, width, height rectangle.
 */
public final static Image getImageRegion(Image source, int x, int y, int width, int
height)
{
   // create a placeholder for our resulting image region
   Image result = Image.createImage(width, height);

   if (x + width > source.getWidth() || y + height > source.getHeight())
      System.out.println("Warning: attempting extract using (" +
                     x + "," + y + "," + width + "," + height + ") when image is " +
                     "(" + source.getWidth() + "," + source.getHeight() + ")");

   // draw the image, offset by the region starting position
   result.getGraphics().drawImage(source, -x, -y, Graphics.TOP|Graphics.LEFT);

   return result;
}
Did you spot the trick? Let me explain how this works. To extract the correct image portion, you first create a new image the same size as the area you want to extract. The method does this with the following line:
Image result = Image.createImage(width, height);
Next, all you need to do is draw the source image (the big one) onto this new target area, offset by the position of the area you want to extract. Figure 9.6 illustrates what I mean.
Figure 9.6. Using clipping to extract a portion of an image
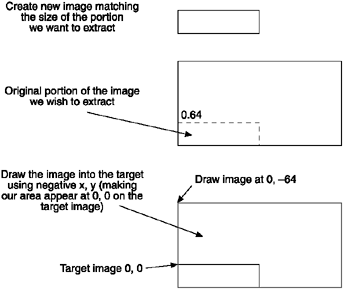
As you can see, all you're doing is drawing the source image starting at 0, 64. The image drawn onto the target at position 0, 0 is what was on the source image starting at 64. Here's the code the method uses to do this:
result.getGraphics().drawImage(source, -x, -y,Graphics.TOP|Graphics.LEFT);
A quick thanks goes out to the MIDP developers for allowing that one!
Separating the Frames
Now that you know how to grab only a portion of an image, you can use this code to extract the individual frames for an animation from the larger composite image. For the shields, this would be the four 20 x 20 pixel images located on the bottom right of your file. The following method uses the getImageRegion method to do this:
/**
 * Gets an array of images by breaking a larger image into smaller frames.
 * @param sourceImage The image to extract the frames from.
 * @param sourceX The starting x position in the source image to use.
 * @param sourceY The starting y position in the source image to use.
 * @param framesWide The number of frames across the source image to extract.
 * @param framesHigh The number of frames down the source image to extract.
 * @param frameWidth The width of each of those frames.
 * @param frameHeight The height of each of those frames.
 * @return An array containing an image for each frame.
 */
public final static Image[] extractFrames(Image sourceImage, int sourceX,
                                          int sourceY,
                                          int framesWide, int framesHigh,
                                          int frameWidth, int frameHeight)
{
   // extract all the frames from the source image
   Image[] frames = new Image[framesWide * framesHigh];
   int frameCount = 0;

   for (int fy = 0; fy < framesHigh; fy++)
      for (int fx = 0; fx < framesWide; fx++)
         frames[frameCount++] =
                  getImageRegion(sourceImage, sourceX + (fx * frameWidth),
                                   sourceY + (fy * frameHeight),
                                   frameWidth, frameHeight);
   return frames;
}
This method is quite simple. First, you create an array of images to hold your results. Two for loops (one inside the other) then loop through every frame (fx) along each row (fy), using the getImageRegion method to extract the frame you want. The result is stored in the image array and then returned.
Using the method is also pretty easy. Here's how you'd pull out the shield frames from the ship.png image file:
Image[] shieldFrames = ImageSet.extractFrames(shipImage, 0, 64, 4, 1, 20, 20);
This line extracts four frames across and one frame down starting at position 0, 64 in the source image, with each frame being 20 x 20 pixels.
Once you have the array of frame images, you can draw them by accessing the array element that corresponds to the frame you want. For example, if you wanted to draw the last shield image, you could use
graphics.drawImage(shieldFrames[3], 0, 0, Tools.GRAPHICS_TOP_LEFT);
Getting Some Action
Now that you have the code to load up the frames of a sprite, it's time to see it in action. In the following example, you load the ship frames and then spin the red ship around by cycling through all the frames. I've excluded the standard MIDlet support methods as well as the image extraction methods I've already covered.
NOTE
Tip
You'll find the source code and a working JAD/JAR for this example on the CD under the Chapter 9 source code directory using the name SpriteTest.
import javax.microedition.midlet.*;
import javax.microedition.lcdui.*;
import java.io.IOException;

/**
 * An example that demonstrates the use of the ImageSet class to create a sprite.
 * Note that this is used as a precursor to creating a Sprite class, not as an
 * example of how to use the Sprite class.
 * @author Martin J. Wells
 */
public class SpriteTest extends MIDlet implements CommandListener, Runnable
{
   private static int SHIP_FRAME_WIDTH = 16;
   private static int SHIP_FRAME_HEIGHT = 16;

   private MyCanvas myCanvas;
   private Command quit;
   private Image[] shipFrames;
   private boolean running;
   private int currentFrame;

   /**
    * A custom canvas that will draw the current frame in the animation.
    */
   class MyCanvas extends Canvas
   {
      /**
       * The overidden Canvas class paint method takes care of drawing the
       * current frame.
       * @param graphics The graphics context on which you draw.
       */
      protected void paint(Graphics graphics)
      {
         graphics.setColor(0);
         graphics.fillRect(0, 0, getWidth(), getHeight());

         graphics.drawImage(shipFrames[currentFrame], getWidth() / 2, getHeight() / 2,
                              Graphics.HCENTER | Graphics.VCENTER);

      }
   }
   /**
    * Constructor loads the ship.png file (make sure this image file is in the
    * JAR (and not in a subdirectory) for this code to work. After loading the
    * image we extract the frames, create an image set then setup the canvas.
    */
   public SpriteTest()
   {
      try
      {
         // Construct the image and extract the red ship frames
         Image shipImage = Image.createImage("/ship.png");
         shipFrames = ImageSet.extractFrames(shipImage, 4 * SHIP_FRAME_WIDTH,
                                                0, 4, 4, SHIP_FRAME_WIDTH,
                                                SHIP_FRAME_HEIGHT);
      }
      catch (IOException ioe)
      {
         System.out.println("unable to load image");
      }

      // Construct the canvas
      myCanvas = new MyCanvas();

      // And a way to quit
      quit = new Command("Quit", Command.EXIT, 2);
      myCanvas.addCommand(quit);

      myCanvas.setCommandListener(this);

      // create the thread that will carry out the animation.
      running = true;
      Thread t = new Thread(this);
      t.start();
   }

   public void run()
   {
      while (running)
      {
         // Increment the current frame. Note that this is not a particularly
         // good way to do animation. See the Sprite class for how to handle it
         // properly (using timing).
         currentFrame++;
         if (currentFrame > 15)
            currentFrame = 0;

         // Request a canvas repaint.
         myCanvas.repaint();
         try
         {
            // Hang around a bit.
            Thread.sleep(100);
         }
         catch (InterruptedException e)
         {
         }

      }
   }

   /**
    * Handles Application Manager notification the MIDlet is starting (or
    * resuming from a pause). In this case we set the canvas as the current
    * display screen.
    * @throws MIDletStateChangeException
    */
   protected void startApp() throws MIDletStateChangeException
   {
      Display.getDisplay(this).setCurrent(myCanvas);
   }

   /**
    * Handles Application Manager notification the MIDlet is about to be paused.
    * We don't bother doing anything for this case.
    */
   protected void pauseApp()
   {
   }

   /**
    * Handles Application Manager notification the MIDlet is about to be
    * destroyed. We don't bother doing anything for this case.
    */
   protected void destroyApp(boolean unconditional)
            throws MIDletStateChangeException
   {
   }

   /**
    * The CommandListener interface method called when the user executes
    * a Command, in this case it can only be the quit command we created in the
    * constructor and added to the Canvas.
    * @param command The command that was executed.
    * @param displayable The displayable that command was embedded within.
    */
   public void commandAction(Command command, Displayable displayable)
   {
      try
      {
         if (command == quit)
         {
            running = false;
            destroyApp(true);
            notifyDestroyed();
         }
      }

      catch (MIDletStateChangeException me)
      {
         System.out.println(me + " caught.");
      }
   }

}
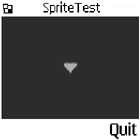
Figure 9.7 shows the output from the full MIDlet. Not bad for a thread and some simple image tools.
Figure 9.7. The results of the SpriteTest MIDlet (it's far more exciting in real life).
NOTE
Note
I find this type of little test MIDlet pretty useful. You can use it to check whether an animation looks good when running on an MID. Feel free to replace the ship graphics with any sprite you require for your game.
You've covered quite a bit to get things to this stage, including loading images, isolating regions, and extracting frames. There are still a few issues to deal with, though. For example, how do you handle animation at different speeds, and what if a sprite has more than one animation? So far, all you have are arrays of images; for Star Assault, you'll need a few more tricks.