Moving at an Angle
You saw that adding to or subtracting from the x- and y-axis components on an object's position will result in it moving along a straight line. If you increment x and y simultaneously you will move both horizontally and vertically (in other words, diagonally) across the screen. The way you move depends on whether you're adding or subtracting values on either the x or y-axes.
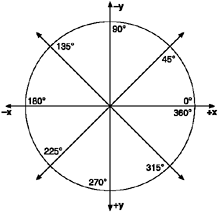
You can think of the movement in any of these directions in terms of degrees around a circle. Movement along the x-axis is 0 degrees (east), following counter-clockwise around the circle for all 360 degrees (see Figure 10.2).
Figure 10.2. The 360 degrees of directions
Cartesian Space
Before we go any further, I need to clarify something regarding the difference between working in screen coordinates and Cartesian coordinates. In Figure 10.3 you can see the Cartesian and screen coordinate systems side by side. The difference is pretty simple, actually. In Cartesian space the y-axis proceeds upward, whereas it proceeds downward in the screen coordinate system. The x-axis is the same in both. As you can see in Figure 10.3, position 50, 50 in Cartesian space is located in the top-right quadrant of the square, whereas it's in the bottom-right quadrant with screen coordinates.
Figure 10.3. In Cartesian space the y-axis extends upward.
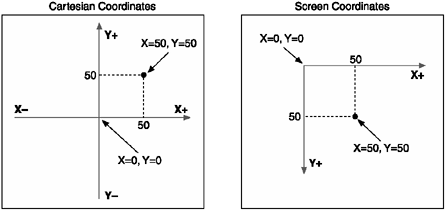
Screen coordinates reflect the way in which you view a computer screen. When you look at a computer monitor, the origin (0, 0) point is in the top-left corner. As you move down, the value of y increases. It's a common misconception to say that screen coordinates can't be negative. Although it's true that you can't draw anything on a screen at a negative position (that would be an interesting trick), you can certainly have an object at a negative screen coordinateit just won't appear on the screen.
The main effect on your movement code is that whenever you use a calculation that's based on Cartesian coordinates (such as trigonometry), you need to invert any resulting y-value. You will see this in action a little later in the chapter.
Directional Movement
Movement along a straight line is simple; you just add or subtract from either the x- or y-axis. The way you go depends on which axis you change. If you adjust both axes simultaneously, you'll move diagonally.
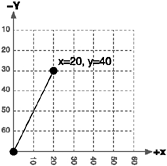
If you take that a little further, you can see that making different size adjustments to either axis will result in movement in a different direction. For example, suppose you add 2 to both the x and y-axes. If you then moved 20 times, you would end up at position 40, 40 (see Figure 10.4). If you refer back to Figure 10.2, you can see the movement was at an angle of 315 degrees (down and to the right). This works for all directions, you move simply by adjusting the amount of either the x or y value you change on every movement step.
Figure 10.4. You can move an object diagonally by making simultaneous adjustments to both the x and y-axes.
This is all nice to know, but if you want your ship in Star Assault to move in any direction, how do you figure out how much to move on each axis? Your goal should be to face the ship at a particular angle and then just move it in that direction. In order to do that, you need to figure out the distance you want to move on each axis corresponding to that angle. For that you need to use a little trigonometry.
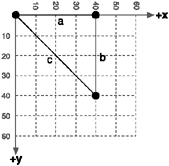
In Figure 10.5, I've modified the diagram in Figure 10.4 to show the right-angle triangle you'll use as the basis for calculating your values. As you can see, Side a, the adjacent, represents the x-axis distance; Side b, the opposite, represents the y-axis distance; and Side c is the hypotenuse of the triangle (in this case, the line from the starting point to the end).
Figure 10.5. A right-angle triangle formed from the coordinates of the origin and target points.
If you say your ship's direction is 60 degrees, you first need to know how far to move along the x and y-axes based on this angle. You can determine the x component using the cosine of this angle (the ratio of the adjacent, or x-axis side, over the hypotenuse) and the y component from the sine (the ratio of the opposite, or y-axis side, over the hypotenuse).
However, because sine and cosine both work with radians, you'll need to convert the angle into radians before you do any calculations. Since there are 2p radians (approximately 6.28) in 360 degrees, you know that the number of degrees to a radian is equal to (approximately) 360 divided by 6.28, or 57.3. So if you divide 60 degrees by the number of degrees per radian (57.3), you'll end up with 1.047 radians.
With your radians in hand, you can now use the sine and cosine trigonometry functions to determine the results you need.
x = cos(1.047) = 0.50
y = sin(1.047) = 0.86
Notice something wrong with the result? The y-axis result is a positive number, but if you refer back to Figure 10.2, you'll see that 60 degrees faces upwards relative to the screen. If we were to add the y-axis result from the calculation above we would move down instead of up. This problem is caused by the mismatch of screen and Cartesian coordinates you saw in the previous section. To fix it you just invert the y-axis result. The calculation should therefore be:
x = cos(1.047) = 0.50
y = -sin(1.047) = -0.86        // Inverted sin to map to screen coordinates.
If you now start from the origin point and keep adding 0.50 to the x component and -0.86 to the y, you'd be moving at 60 degrees!
You might be thinking that this all works fine for easy angles (0 to 90 degrees), but what about as you move further around the circle? The values will have to be negative to move in the right direction. The good news is that you don't have to make any adjustments. As the angles move around the circle (through each quadrant), you'll get either negative or positive values. Figure 10.6 shows my previous diagram with angles in 45-degree increments. As you can see, the values go negative where appropriate. For example, the cosine of 180 degrees is 1 (the x component), and the sine is 0 (the y component). If you add this to an object's position, it will move backward along the x-axis, or 180 degrees.
Figure 10.6. Examples of the x and y-axis adjustments for moving at different angles.

This all works rather nicely; however, before you put all this into some real game code, you still have one more problem to solve. You've probably noticed that these calculations all rely on floating-point values to be correct. (Imagine radians without floating points.) Thus before you can get to some examples of all this in action, you first need to review how to handle floating-point values.
Simulating Floating-Point Math
Since J2ME (or more specifically, the CLDC) doesn't include any support for non-integer values, you're going to find it rather difficult to use trigonometry. To get around this limitation, you need to simulate floating point values using the built-in types you have.
Fixed-point mathematics is not all that hard to simulate. You can just split an integer into two distinct componentsone for a value behind the decimal place and another for a value after the decimal place. Because an integer in Java is 32 bits, you have room for around 4 billion numbers, so even if you use half of all those decimal places for fractional values, you still have enough room for reasonably large numbers on the other side.
Although simulating fractions isn't all that difficult, what about all those math functions you take for granted, such as cosine, square root, and exponent? I don't know about you, but I'd rather be writing game code than trying to rewrite math functions.
MathFP
Thankfully there are a few libraries available that take care of all the work for you. They use built-in types to simulate pretty much all the functionality you'll need. For the purposes of Star Assault, you'll use the MathFP library written by Onno Hommes. MathFP has an excellent range of features, including variable precision and versions using both long and int base types. I've found it to be a robust, reliable, and extremely fast solution. You can download the library from http://home.rochester.rr.com/ohommes/MathFP.
NOTE
Note
MathFP is subject to a license agreement, so be sure to read the conditions before you use the library in a publicly released product. It should only be used for non-commercial purposes.
I chose MathFP because it's a stable and simple system I felt best demonstrated the use of floating point within J2ME. Other floating point libraries are available which also do the job, such as:
JMFP (http://sourceforge.net/projects/jmfp)
FPLib (http://bearlib.sourceforge.net/)
ShiftFP (http://sourceforge.net/projects/shiftfp/)
MathFP has a number of different implementations you can use (all located in the classes directory). The two that will be useful to you are net.jscience.math.MathFP, which uses a long as its base type, and net.jscience.math.kvm.MathFP, which uses an int as the base type. Unless you're doing something with seriously high precision, you won't need to use a long (8 bytes) as the base type, so you can save space and use the net.jscience.math.kvm.MathFP class (using a 4-byte integer).
NOTE
Note
Don't forget to add this entry to your class path. You'll also need to include this class in your game's JAR file, in the location /net/jscience/math/kvm/MathFP.class.
Using MathFP
Once you have things set up, using MathFP is very painless. Here's how you create an FP (fixed-point) value:
int xFP = MathFP.toFP("0.1");The first thing you'll notice is that I didn't declare a type or object called MathFP; I just created an integer variable and then used the MathFP library to fill in the value. All MathFP methods are static, and the class is declared abstract as well.
Because there is no way to actually express a fractional value using J2ME (you'll get a language error), I've used the MathFP library's toFP(String) to convert a string representation of my value into an FP equivalent. If you were to print the variable xFP out to the screen, you'd actually see 1677721. How does this relate to 0.1, you ask? Never mindthat's MathFP's internal representation of the value of 0.1. If you want to print out the value, you first need to ask MathFP to decode it for you.
System.out.println( MathFP.toString(xFP) );
And you'll see your original value again0.1.
As you can see, you must never make the mistake of thinking that an FP value is an integer in the normal sense. Although it uses the integer type to store data, that's where the similarity ends. If you want to work with FP values, you must use the corresponding MathFP methods. This is why I add the two letters at the end of the name of a variable. When I first used MathFP, I found that I often forgot a value was an FP and so I used it in conjunction with regular integers. This would result in weird, hard-to-find bugs. I'm not normally a fan of adding type identifiers to variable names (Hungarian notation); however, because you'll commonly need both integer and FP equivalent values (such as having a distinct variable x and xFP) and there's no built-in type protection available from the compiler, I think it's worth doing in this case.
Table 10.1 lists all the main methods in the MathFP API. As you can see, you have just about everything you'll need.
|
Method |
Description |
|---|---|
|
static int abs(int n) |
Returns the absolute value of n. |
|
static int acos(int r) |
Returns the arc cosine of r (radians). |
|
static int add(int n, int m) |
Returns the sum of n and m. |
|
static int asin(int r) |
Returns the arc sine of r (radians). |
|
static int atan(int r) |
Returns the arc tangent of r (radians). |
|
static int atan2(int y, int x) |
Returns the principal of the arc tangent of y/x (radians). |
|
static int convert(int a, int b) |
Changes the precision of an FP value. |
|
static int cos(int r) |
Returns the cosine of r (radians). |
|
static int cot(int r) |
Returns the cotangent of r (radians). |
|
static int div(int n, int m) |
Divides n by m and returns the result. |
|
static int exp(int x) |
Returns the natural number raised to the power of x. |
|
static int getPrecision() |
Returns the current precision used. |
|
static int log(int s) |
Returns the logarithm of s. |
|
static int max(int n, int m) |
Returns the greater of n and m. |
|
static int min(int n, int m) |
Returns the lesser of n and m. |
|
static int mul(int n, int m) |
Multiplies n by m and returns the result. |
|
static int pow(int b, int e) |
Returns a value raised to another. |
|
static int round(int x, int d) |
Rounds a value to a certain precision. |
|
static int setPrecision(int p) |
Alters the level of precision used by the library. |
|
static int sin(int r) |
Returns the sine of r (radians). |
|
static int sqrt(int s) |
Returns the square root of s using 24 iterations. |
|
static int sqrt(int s, int i) |
Returns the square root of s using I iterations. Use a lower number of iterations to increase the speed of this operation. However the result will be less precise. Valid values are 6 to 24 with 24 being the most accurate (and slowest). |
|
static int sub(int n, int m) |
Subtracts m from n and returns the result. |
|
static int tan(int r) |
Returns the tangent of r (radians). |
|
static int toFP(int i) |
Converts a normal integer to an FP. |
|
static int toFP(String s) |
Converts a string to an FP. |
|
static int toInt(int f) |
Converts an FP back to an integer (discarding the fraction). |
|
static String toString(int f) |
Converts an FP into a string. |
|
static String toString(int f, int d) |
Converts an FP into a string (with rounding). |
Using these methods is also very easy. Here's an example of multiplying and then dividing an FP value:
int xFP = MathFP.toFP("0.10");
int yFP = MathFP.toFP("0.2");
int zFP = MathFP.mul(xFP, yFP);
System.out.println( MathFP.toString( zFP ) );   // 0.20
zFP = MathFP.div(xFP, yFP);
System.out.println( MathFP.toString( zFP ) );   // 0.05
A Moving Example
All right, you've figured out how to move at an arbitrary angle, and with the MathFP library you have the functionality to do it. Now you can put everything together and make a little ship fly around the screen in any direction you want. Here's the code:
NOTE
Tip
The complete code and a working JAD/JAR for basic movement are on the CD under the Chapter 10 source code directory "Direction Movement".
import net.jscience.math.kvm.MathFP;
import javax.microedition.midlet.*;
import javax.microedition.lcdui.*;
import java.io.IOException;

/**
 * A demonstration of moving an on-screen object in an arbitrary direction.
 * @author Martin J. Wells
 */
public class DirMoveTest extends MIDlet implements CommandListener, Runnable
{
   private static int SHIP_FRAME_WIDTH = 16;
   private static int SHIP_FRAME_HEIGHT = 16;
To save time you should always pre-calculate MathFP values if you can.
   public static final int FP_PI2 = MathFP.mul(MathFP.PI, MathFP.toFP(2));
   public static final int FP_DEGREES_PER_RAD = MathFP.div(MathFP.toFP(360), FP_PI2);
   public static final int FP_22P5 = MathFP.toFP("22.5");

   private GameScreen myCanvas;
   private Command quit;
   private boolean running;
   private Sprite shipSprite;

   /**
    * A custom canvas class that handles drawing, cycling and input for a basic
    * movement example.
    */
   class GameScreen extends Canvas
   {
Note the addition below of properties to hold the position of the Ship and its current direction. Note that I'm using MathFP values for the ship's position, whereas the direction is just a plain old integer value (since we don't ever need to deal with fractional angles). The code that actually moves the ship is in the cycle method.
      // ship properties
      private int shipXFP;          // x position (as a MathFP)
      private int shipYFP;          // y position (as a MathFP)
      private int direction;        // current direction in degrees

      /**
       * Constructor that sets up the position of the ship.
       */
      public GameScreen()
      {
         shipXFP = MathFP.toFP(50);
         shipYFP = MathFP.toFP(50);
      }

      /**
       * Canvas paint implementation which clears the screen and then draws
       * the ship at its current position.
       * @param graphics The graphics context on which to draw.
       */
      protected void paint(Graphics graphics)
      {
         // Clear the screen.
         graphics.setColor(0);
         graphics.fillRect(0, 0, getWidth(), getHeight());
Here you can see the alignment of the ship's direction to an appropriate frame by dividing the direction by 22.5. You then set the ship sprite frame to match this value, and it will take care of the rest. We use MathFP to properly handle the fractions.
   int frame = MathFP.toInt(MathFP.div(MathFP.toFP(direction), FP_22P5));

   // Set the ship sprite frame to be the one matching the direction.
   shipSprite.setFrame(frame);

   // Draw that frame on the screen.
   shipSprite.draw(graphics, MathFP.toInt(shipXFP),
                     MathFP.toInt(shipYFP));
}

/**
 * Moves the ship based on the angle it's facing.
 */
public void cycle()
{
This code is where we change the x and y position of the Ship based on the cosine and sine functions, respectively. Because these methods work in radians, not degrees, you convert the direction angle before you use it.
NOTE
Note
Trigonometry functions are very slow. In Chapter 15, "The Optimizing," you'll look at methods to speed this up.
   // Move the ship according to its current direction (in radians).
   int dirRadians = MathFP.div(MathFP.toFP(direction),
      FP_DEGREES_PER_RAD);
   // Add the x component of the movement (cos radians)
   shipXFP = MathFP.add( shipXFP, MathFP.cos(dirRadians) );
   // Add the y component of the movement (negative sin radians). We
   // use negative sin to convert from Cartesian to screen coordinates.
   shipYFP = MathFP.add( shipYFP, -MathFP.sin(dirRadians) );

   // Check our position and wrap around to the other side of the canvas
   // if we have to.
   if (MathFP.toInt(shipXFP) < 0)
      shipXFP = MathFP.toFP(myCanvas.getWidth()-1);
   if (MathFP.toInt(shipXFP) > myCanvas.getWidth())
      shipXFP = MathFP.toFP(0);
   if (MathFP.toInt(shipYFP) < 0)
      shipYFP = MathFP.toFP(myCanvas.getHeight() - 1);
   if (MathFP.toInt(shipYFP) > myCanvas.getHeight())
      shipYFP = MathFP.toFP(0);
}

/**
 * React to keys pressed by the user.
 * @param keyCode The code of the key the players pressed.
 */
protected void keyPressed(int keyCode)
{
   int action = getGameAction(keyCode);
This example also adds support for turning the Ship when the user hits either the left or right arrow key. The following code reads the key and then adjusts the direction angle appropriately.
You might wonder why I've added 23 degrees. This is because your ship sprite has 16 frames, so if you divide 360 by 16, you know that each frame represents 22.5 degrees. (In this case it doesn't make any difference whether you move in 22.5- or 23-degree increments.) Each time you get a key press, you adjust the direction by 23. This means you'll always be flying in a direction that closely matches the way the picture of the ship is facing. If you didn't do this, you'd be flying one way but the ship would be facing another direction.
            // Based on the key they pressed we adjust the facing angle by an
            // increment equal to the facing directions of the ship (16 possible
            // translates to 22.5 which we round up to 23).
            if (action == RIGHT) direction -= 23;
            if (action == LEFT) direction += 23;

            // Wrap the direction around if it's now invalid.
            if (direction < 0) direction = 359-23;
            if (direction > 358) direction = 0;
         }
      }

      /**
       * MIDlet constructor loads up the ship graphics and then creates a
       * corresponding ImageSet and Sprite. It then constructs a canvas and quit
       * command.
       */
      public DirMoveTest()
      {
      // Load up the standard ship graphics and make up a Sprite.
      try
      {
         Image[] frames = ImageSet.extractFrames(Image.createImage("/ship.png"),
                                                     0, 0, 4, 4,
                                                     SHIP_FRAME_WIDTH,
                                                     SHIP_FRAME_HEIGHT);
         ImageSet set = new ImageSet(1);
         set.addState(frames, 0);
         shipSprite = new Sprite(set, 0, 0);
      }
      catch (IOException ioe)
      {
         System.out.println("unable to load image");
      }

      // Construct a canvas.
      myCanvas = new GameScreen();

      // And a way to quit.
      quit = new Command("Quit", Command.EXIT, 2);
      myCanvas.addCommand(quit);
      myCanvas.setCommandListener(this);

      running = true;
      Thread t = new Thread(this);
      t.start();
   }

   /**
    * Runnable interface run method that cycles the ship and requests a repaint
    * of the Canvas.
    */
   public void run()
   {
      while (running)
      {
         myCanvas.repaint();
         myCanvas.cycle();

         try
         {
            // Simple timing - sleep for 100 milliseconds.
            Thread.sleep(100);
         }
         catch (InterruptedException e)
         {
         }
      }
   }

   /**
    * Handles Application Manager notification the MIDlet is starting (or
    * resuming from a pause). In this case we set the canvas as the current
    * display screen.
    * @throws MIDletStateChangeException
    */
   protected void startApp() throws MIDletStateChangeException
   {
      Display.getDisplay(this).setCurrent(myCanvas);
   }

   /**
    * Handles Application Manager notification the MIDlet is about to be paused.
    * We don't bother doing anything for this case.
    */
   protected void pauseApp()
   {
   }

   /**
    * Handles Application Manager notification the MIDlet is about to be
    * destroyed. We don't bother doing anything for this case.
    */
   protected void destroyApp(boolean unconditional)
            throws MIDletStateChangeException
   {
   }

   /**
    * The CommandListener interface method called when the user executes
    * a Command, in this case it can only be the quit command we created in the
    * constructor and added to the Canvas.
    * @param command The command that was executed.
    * @param displayable The displayable that command was embedded within.
    */
   public void commandAction(Command command, Displayable displayable)
   {
      try
      {
         if (command == quit)
         {
            running = false;
            destroyApp(true);
            notifyDestroyed();
         }
      }

      catch (MIDletStateChangeException me)
      {
         System.out.println(me + " caught.");
      }
   }

}
To see how all this works you can just load and run the DirMoveTest.jad in the Direction Movement example directory under Chapter 10 source code on the CD.
That about wraps up basic movement; however, in Star Assault you're dealing with spaceships, so you can make things a little more interesting by applying a more realistic space flight model using directional velocity, thrust, and acceleration.