The Graphics
The first thing you need to make an iso game is graphics that match the perspective you're portraying. Figure 20.4 shows the three images used for the demo.
Figure 20.4. A tank, grass, and tree tiles rendered with an iso perspective.
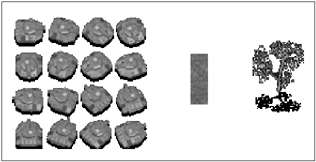
The tank is very similar to sprites you have seen before. The only major difference is that it appears at a vertical tilt, like the tree. The freshly cut grass doesn't have any height to it so it's just rendered flat.
You might notice I'm using the PNG alpha channel for the shadows. The sprites use a highly transparent black, which creates the cool effect of casting a shadow that blends with the terrain over which the object is drawn. The tree's shadow, for example, is built into the image already and will darken the grass over which it's placed. (I guess it's just me, but I really do have a thing for alpha blending.) Try to resist the temptation to overuse alpha blending effects though; it takes extra time to render every one of those alpha pixels. If you don't want to use the alpha channel for shadows, you can simply use black pixels. Either way, you'll find that shadows really help to portray the feeling of depth in your graphics.
NOTE
Tip
You can see a complete working example of an isometric engine in the Chapter 20 source code directory on the CD.
To get these graphics into the game you can use the ImageSet and Sprite classes developed for Star Assault (in Chapter 9, "The Graphics"). For example, to load the tank with its 16 states you need code very similar to how the original Ship class worked:
Image tankImage = ImageSet.loadClippedImage("/tank.png", 0, 0);
tankImageSet = new ImageSet(16);
Image[] tankImages = ImageSet.extractFrames(tankImage, 0, 0, 4, 4, 32, 32);

for (int i=0; i < 16; i++)
{
    Image[] s = { tankImages[i] };
    tankImageSet.addState(s, 0);
}
The Basic World
You might have noticed a bit more to the demo game than just an altered perspective. I've also added multiple layers so the tree can appear on top of the ground. To do this, you need to expand the basic world structure to handle these multiple layers. For this demo you'll only need two layers (the ground and the trees), but feel free to expand on this if you need more.
The first step is to expand the byte array you use to represent the tile. For example:
private int tilesDeep = 2;
private int tilesWide = 50;
private int tilesHigh = 50;
private byte[][][] tileMap;
You'll also need to add some tile types for this game:
public static final byte NO_TILE = 0;
public static final byte GRASS1_TILE = 1;
public static final byte GRASS2_TILE = 2;
public static final byte GRASS3_TILE = 3;
public static final byte TREE_TILE = 4;
To initialize these distinct layers you need to reference the depth as well. For example, to set a ground tile to be a certain type of grass, you would use the following line:
tileMap[0][8][8] = GRASS1_TILE;
To set a tree you need to use the higher layer. For example:
tileMap[1][8][8] = TREE_TILE;
Both of these tiles will now coexist happily on the same location.
Drawing with Perspective
Next you need to redo the rendering process so both layers are displayed. By itself this is pretty easysimply render one layer and then the other. For example:
for (int td=0; td < tilesDeep; td++)     // go through all the layers
{
    for (int ty=startY; ty < th; ty++)
    {
        for (int tx=startX; tx < tw; tx++)
        {
                t = tileMap[td][ty][tx];
                if (td == 0 && t == NO_TILE) continue;

                xpos = (tx * TILE_WIDTH)- viewX;
                ypos = (ty * TILE_HEIGHT) - viewY;

                if (t > 0)
                    tiles.draw(g, t-1, 0, xpos, ypos);
            }
        }
    }
}
Keep in mind that to make it work properly in the iso perspective, you need to render the tiles so that foreground objects obscure background ones. You can see this illustrated in Figure 20.5.
Figure 20.5. You need to render objects in order, toward the player, so they obscure those in the back (behind the player's view).
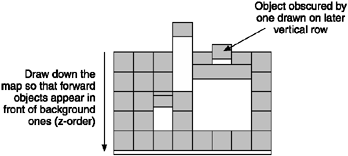
The good news is, this is already how you're doing things: You progress upward through the y-axis, thus things are drawn effectively "toward" the screen. This is known as the z- order of drawing because it reflects the distance an object is from the viewer.
There's something else you need to handle, though. The tree tile is quite special because it has height that extends outside of its tile dimensions. Notice how the graphic is 48 x 48 pixels, even though the tiles in your engine are only 16 x 16 pixels. That's because the tree has perspective height; you need to accommodate this when you are drawing the tree. You can see this demonstrated in Figure 20.6.
Figure 20.6. You might need to offset the position of some tiles so the base of the object appears in the tile position (rather than on top of the object).

Notice that in the first picture the top of the tree image is aligned to the tile position. This is obviously incorrect and will prove very confusing if you try to drive around on this mapnone of the trees will appear to be in the right spots.
The trick to solving this is to offset the rendering of the tile image by an amount that moves the base of the object into the correct position. As you can see in the second image, once this is done the tree appears correctly relative to the tile.
The easiest way to do this in the code is to detect the tile type as it's being rendered and then offset it. For example:
for (int td=0; td < tilesDeep; td++)     // go through all the layers
{
    for (int ty=startY; ty < th; ty++)
    {
        for (int tx=startX; tx < tw; tx++)
        {
                ...

                if (t > 0)
                {
                    if (t == TREE_TILE)
                        tiles.draw(g, t-1, 0, xpos-16, ypos-42);
                    else
                        tiles.draw(g, t-1, 0, xpos, ypos);
                }
            }
        }
    }
}
This method can get a little cumbersome, though, so you might want to place the offsets for each tile type in a separate resource (text) file and load them when you load the images. This is also more convenient for artists because they can switch graphics without having to change the source and rebuild the game.
That's it for rendering the static tiles. Next you'll look at how to deal with actors (objects that move).
Handling Actors
Drawing the actors in your world presents a little more of a problem. If you recall, in Star Assault you drew all the tiles and then you drew the actors (ships, mines, and bullets) afterward as a separate process. Unfortunately, you can't do that with an iso perspective. What if the tank is driving behind a tree? As you can see in Figure 20.7, if you draw the tank after the tree it will look completely wrongor you'll think tanks grow on trees.
Figure 20.7. If you draw the actors after tiles (as you did in Star Assault), they will appear in front of tiles that are closer to the player (according to the new perspective).
Instead of drawing the actors in a separate operation after all the tiles, you need to draw them in the same pass. This is the same principal you saw when drawing the tiles; you simply need to draw the actors at the same time.
The key to understanding how all this works is the term "z-order". Because you're simulating a perspective in which the player looks straight down the field (with no side-on component), you only need to make sure objects are drawn at the correct depth level relative to that perspective (the z-order).
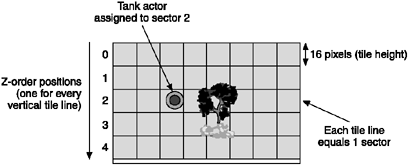
In Figure 20.8, you can see a screen divided into the typical 16 x 16-pixel tile grid. Each of the vertical rows is numbered progressively toward the screen according to its z-order position. As you can see, the tree is in row 3, while the tank is in row 2. If you draw things according to this order, the tank will appear correctly behind the tree.
Figure 20.8. You must draw actors at the correct vertical row (z-order) so they appear as though they are behind tiles.
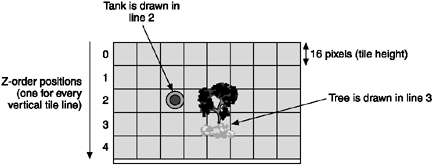
To find out an actor's z-order, simply divide its y-position by the tile height. For example:
int currentZorder = playerTank.getY() / TILE_HEIGHT;
All sounds pretty easy so far, right? When you finish drawing a row of tiles you can simply find all the actors with a z-order matching the current row and draw them. The problem, however, is how you go about determining which actors are in that particular row. If you were to check every actor's position for every row you draw, it would take way too much time on a map with many actors. What you really need is a fast mechanism for tracking the z-order of all your actors. Enter sectors.
Using Sectoring
To speed up locating objects within a given space you can use a technique known as sec toring. This involves dividing the world into distinct subsections, and then storing references to all the actors currently within each sector. As actors move around, they are switched from one sector container to another.
Because sectors relate to a particular area on the map, what you're doing is effectively sorting objects into easily referenced geographical groups (see Figure 20.9).
Figure 20.9. A fast method for maintaining a geographical sorting of objects is to assign them to distinct sectors.
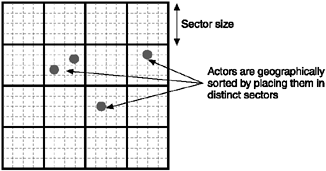
Sectoring makes things faster because you can deal with all the objects in a world in small sections, rather than all in one shot. For example, if you want to determine which objects should be drawn in a current vertical row, you only need to check the sectors that are relative to the screen; you don't need to check any sectors outside of that range.
How large or small you make a sector comes down to the type of game you're making and how actors move around in it. If you make sectors too small, for example, you'll spend too much time moving actors between them. If they're too large, the processing you do on each sector will take too long (due to the high number of actors within each one). It's a bit of a balancing act that's dependent on your game type.
For your little tank demo, the most convenient system is to make a sector equal to the tile height so you can use it to reflect which actor is in each tile row. So one sector contains any object in one complete tile row extending all the way across the world. After you draw each tile row (z-order), you then draw all the actors in that sector (row).
Okay, take a look at a real example of this sectoring thing. The main thing you need is a container for the actor references in each sector. This needs to be very fast in order to move entries in and out, and it cannot use much storage. Most important, you don't want to bother storing much information for areas of the map that don't contain any actors. The best storage mechanism for this is (you guessed it) a simple linked list.
For the tank demo you'll make a sector for every vertical line, so you need an array pointing to the first actor object in each sector in the World class. For example:
Actor[] actorZMap = new Actor[tilesHigh];
To store objects in a doubly-linked list you need to maintain a link to both the next object and the previous one. The easiest (and most efficient) way to do this is to simply add two references to the Actor class, as well as methods to manage them.
Figure 20.10. For your little tank game, you can make a sector equal to one tile row.
NOTE
Note
Remember, this is J2ME; you could come up with a great reusable linked list entity system here, but it's typically not worth the class space. The far cheaper method is to simply adapt the target class (in this case, the Actor object) by throwing in some extra references.
private Actor nextInZMap;           // used by zmap to ref next actor
private Actor prevInZMap;           // used by zmap to ref prev actor

public void setNextInZMap(Actor a) { nextInZMap = a; }
public Actor getNextInZMap() { return nextInZMap; }
public void setPrevInZMap(Actor a) { prevInZMap = a; }
public Actor getPrevInZMap() { return prevInZMap; }
Next you need to add (or move) actors to the appropriate linked list whenever they move. To catch these events you'll have the Actor class call a method in the World class whenever a position changes.
public void cycle(long deltaMS)
{
    ...

    if (ticks > 0)
    {
        // movement code...

        // tell the world we moved
        world.notifyActorMoved(this, lastX, lastY, x, y);
    }
}
In the World class you put the logic to manage the linked list in each z-order position in the notifyActorMoved method. Don't let the amount of code freak you out; it's simpler than it looks.
public void notifyActorMoved(Actor a, int oldX, int oldY, int x, int y)
{
    // figure out the z-order positions (Y tile position)
    int oldYTilePos = getTileY(oldY);
    int yTilePos = getTileY(y);

    // if they have indeed moved to another sector (vertical row) then
    // we need to move them from one linked list to another
    if (oldYTilePos != yTilePos)
    {
        // go through all the actors in this sector's list until you find
        // this one - try the very fast case first (one item in list)
        if (actorZMap[oldYTilePos] == a && a.getNextInZMap() == null)
            actorZMap[oldYTilePos]=null;
        else
        {
            if (actorZMap[oldYTilePos] != null)
            {
                // we assume in this case that there must be at least two entries
                // in this linked list (since the above test failed)
                Actor actorToRemove = actorZMap[oldYTilePos];
                while (actorToRemove != a && actorToRemove != null)
                    actorToRemove = actorToRemove.getNextInZMap();

                // if there was an entry matching the actor
                if (actorToRemove != null)
                {
                    // set my next's prev to my prev (thus replacing me)
                    if (actorToRemove.getNextInZMap() != null)
                        actorToRemove.getNextInZMap().setPrevInZMap(actorToRemove.
                        getPrevInZMap());
                    // set my prev's next to my next
                    if (actorToRemove.getPrevInZMap() != null)
                        actorToRemove.getPrevInZMap().setNextInZMap(actorToRemove.
                        getNextInZMap());

                    // replace the head of the list if it was removed
                    if (actorZMap[oldYTilePos] == actorToRemove)
                        actorZMap[oldYTilePos] = actorToRemove.getNextInZMap();

                    // **NOTE: we don't bother updating a's next and prev because it will
                    // be fixed up when we add it into another list (this is a move
                    // function, not a remove)
                }
            }
        }

        // add the actor into the new spot. do the empty list case first
        // (the most common case).
        if (actorZMap[yTilePos] == null)
        {
            a.setNextInZMap(null);
            a.setPrevInZMap(null);
            actorZMap[yTilePos] = a;
        } else
        {
            // one or more, find the tail of the list and append this ref
            Actor tail = actorZMap[yTilePos];
            while (tail.getNextInZMap() != null)
                tail = tail.getNextInZMap();
            tail.setNextInZMap(a);

            a.setPrevInZMap(tail);
            a.setNextInZMap(null);
        }
    }
}

public final int getTileY(int y) { return y / TILE_HEIGHT; }
The result of this code is a maintained linked list for each sector. You can move actors around, and this code will now take care of making sure each of the sectors contains a list of only the actors in that specific area.
Now that you have all the actors sorted into the sectors, you can revisit the World class rendering code. Following is the revised code; this time you can see that you draw the first layer (the grass) and then, as you draw the upper layer (the trees), you also draw any actors that are in that tile row (sector).
public final void render(Graphics g)
{
    try
    {
        int startX = (viewX / TILE_WIDTH) - 5;
        int startY = (viewY / TILE_HEIGHT) - 5;
        int tw = ((Math.abs(viewX) + viewWidth) / TILE_WIDTH) + 5;
        int th = ((Math.abs(viewY) + viewHeight) / TILE_HEIGHT) + 5;

        if (tw > tilesWide) tw = tilesWide;
        if (th > tilesHigh) th = tilesHigh;

        int t=0;
        int xpos=0;
        int ypos=0;
        for (int td=0; td < tilesDeep; td++)
        {
            for (int ty=startY; ty < th; ty++)
            {
                for (int tx=startX; tx < tw; tx++)
                {
                    if (ty >= 0 && tx >= 0)
                    {
                        t = tileMap[td][ty][tx];

                        // quick abort if it's nothing and we're only doing the
                        // ground layer (no actors to worry about)
                        if (td == 0 && t == NO_TILE) continue;

                        xpos = (tx * TILE_WIDTH)- viewX;
                        ypos = (ty * TILE_HEIGHT) - viewY;

                        if (t > 0)
                        {
                            if (t == TREE_TILE)
                                tiles.draw(g, t-1, 0, xpos-16, ypos-42);
                            else
                                tiles.draw(g, t-1, 0, xpos, ypos);
                        }

                        // if this is the second pass then we draw the actors
                        // at this z-order
                        if (td==1)
                        {
                            Actor a = actorZMap[ty];
                            while (a != null)
                            {
                                a.render(g, viewX, viewY);
                                a = a.getNextInZMap();
                            }
                        }
                    }
                }
            }
        }

    }
    catch (Exception e)
    {
        System.out.println("App exception: " + e);
        e.printStackTrace();
    }
}
The end result of this is a lightning-fast sectoring system that does a great job rendering objects properly for your perspective view.
Collision Detection
Now that you've seen how to handle the drawing of objects with some perspective, take a look at how all this affects collision detection.
There are two main collision areas you need to coveractors hitting tiles and actors hitting other actors. You'll deal with these separately in a moment.
Basic Tile Collisions
The good news is that not much changes, and what does only gets better. The basic tile collision system you use in Star Assault doesn't really change in an isometric view. The main thing is you no longer want to check for collisions at depth 0 (the ground layer). Other than that, things look pretty much the same. For example, here's the World class basic tile collision code for the tank demo.
public final boolean checkCollision(Actor hitter, int x, int y, int w, int h)
{
    // test if this actor object has hit a tile on layer 1 (we ignore layer 0)
    // we look at all the tiles under the actor (we do a <= comparison so we
    // include the bounding edge of the actor's rectangle)
    for (int iy=y; iy <= y+h; iy += TILE_HEIGHT)
    {
        for (int ix=x; ix <= x+w; ix += TILE_WIDTH)
        {
            if (getTile(1, ix, iy) > 0)
            {
                hitter.onCollision(null);
                return true;
            }
        }
    }
}
This will handle the basic detection of collisions between the actors (tanks) and any tiles in depth level 1 (trees). Next take a look at collisions between actors and other actors.
Actor Collisions Using Sectors
The good news is that sectoring can really enhance the performance of collision detection as well. In Star Assault you detected collisions among actors simply by checking against all the other actors in the world. Now that you have sectors you can localize your code to check only for collisions with nearby actors, which requires far less work in a map with many actors.
The simplest check you can make is to look up all the actors in the same sector and check whether they are in a collision state. For example here's revised code for the World class's collision system:
int sector = getTileY(hitter.getY());
Actor a = actorZMap[sector];
while (a != null)
{
    // remember to check we're not hitting ourselves!
    if (a.isCollidingWith(hitter) && a != hitter)
        // HIT!!!
    a = a.getNextInZMap();
}
There's a subtle bug in this code, though; an actor is contained within a sector based on its y-position. The problem is this is where the top of the actor is, so what about the bottom? As you can see in Figure 20.11, an actor can easily extend over its sector boundaryin fact, all actors with a height over one pixel will do this as they move downwardand thus collide with another actor that is not within the same sector.
Figure 20.11. Actors can effectively exist in multiple sectors if they're large enough to overlap the sector boundary. In this case, an actor from one sector is colliding with one from a different sector.
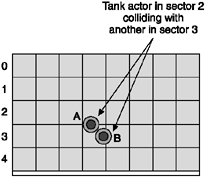
To solve this you need to extend the checking to cover not only the actor's current sector, but also ones above and below it. The number of sectors you check comes down to the size of the biggest actor in your game. You need to check enough sectors to cover all cases.
For the tank demo you know the largest object is 32 pixels high (the tank). Therefore, the maximum number of (16-pixel-high) sectors that one object can exist in at any point in time is two. Therefore, if you check the sector the actor is in, plus the ones directly above and below, you'll be covering all possible collision cases.
Here's the revised collision code; I've factored out the collision logic to a separate method now.
public final boolean checkCollision(Actor hitter, int x, int y, int w, int h)
{
    // tile collision tests...

    // now test if this actor hit another actor in this or an adjacent
    // sector
    int sector = getTileY(y);
    Actor weHit = checkSectorCollision(hitter, sector, x, y, w, h);
    if (sector + 1 < actorZMap.length && weHit == null)
        weHit = checkSectorCollision(hitter, sector+1, x, y, w, h);
    if (sector - 1 >= 0 && weHit == null)
        weHit = checkSectorCollision(hitter, sector-1, x, y, w, h);

    if (weHit != null)
    {
        hitter.onCollision(weHit);
        return true;
    }
    return false;
}

private Actor checkSectorCollision(Actor hitter, int sector, int x, int y, int w, int
h)
{
    // check to see if we hit another actor in this sector (we ignore ourselves)
    Actor a = actorZMap[sector];
    while (a != null)
    {
        if (a.isCollidingWith(x, y, w, h) && a != hitter)
            return a;
        a = a.getNextInZMap();
    }
    return null;
}
Adding Windows
Another common technique used in isometric games is to have different collision states relative to the perceived height of an object. It might seem obvious, but a good example is the grass. Anything existing at depth 0 is not checked for collisions. You can extend this a bit further and have certain tile types that do not cause collisions with projectiles, but do collide with other actors. For your tank game, for example, you could have tiles such as pits, barbed wire, rivers, or bushes. In all these cases you'll obstruct the tank from moving but let weapons fire go through.
I find the easiest way to do this is to assign a certain range of tiles typed as windows. In the collision code you can compare the type of actor (whether it is a bullet or a projectile) with the tile range. If a projectile-type actor collides with a window range tile, you ignore it. For example, I define tiles such as:
public static final byte START_WINDOW_TILE = 12;
public static final byte BARBED_WIRE_TILE = 12;
public static final byte BUSH_TILE = 13;
public static final byte PIT_TILE = 14;
public static final byte RIVER_TILE = 15;
public static final byte END_WINDOW_TILE = 15;
Then the collision code needs to be adapted to check for the extra case. For example:
public final boolean checkCollision(Actor hitter, int x, int y, int w, int h)
{
    for (int iy=y; iy <= y+h; iy += TILE_HEIGHT)
    {
        for (int ix=x; ix <= x+w; ix += TILE_WIDTH)
        {
            // if we hit a tile in the above-ground layer
            byte t = getTile(1, ix, iy);
            if (t > 0)
            {
                // check and ignore if it's a projectile hitting a window
                // tile (isBullet is something borrowed from StarAssault)
                if (!hitter.isBullet() || t < START_WINDOW_TILE ||
                    t > END_WINDOW_TILE)
                {
                    hitter.onCollision(null);
                    return true;
                }
            }
        }
    }
}
NOTE
Tip
Special tile types don't have to stop at windows. When you detect a collision between an actor and a special tile you can also do things such as changing the actor's physics (to make the tank slip in mud) or even the actor graphics (mud sprays).