What Is Ray Casting?
Thousands of years ago the ancient Greeks speculated on the mechanism of the wonder that is the human eye. One theory as to how it worked was that the eye itself fired rays outward, and the brain picked up the results once the rays bounced back. This is somewhat on the right track; they just got things a little backward. You perceive objects because light rays (well, photons actually) bounce off objects into your eyes.
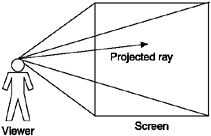
The Greeks might not have discovered how the eye works, but they did provide us with the inspiration for a common method of generating a 3D visual scene, known as ray trac ing. This technique involves starting at the observer's point of view and firing rays into a 3D world (see Figure 21.1). Based on whether the ray hit something and how far it went to do that, you draw a corresponding pixel. If you do this for every pixel on the screen, you'll generate a complete 3D view.
Figure 21.1. A ray-traced image is generated by tracing rays into a 3D world and seeing what they hit.
Tracing each of these rays is a relatively time-consuming process, though. Starting at the origin point, you move one unit forward and check whether you hit anything. If you did, you register the hit. (Effectively, you're bouncing the ray back to the viewer.) You can then draw a different pixel based on the type of hit, such as the color of the object off which the ray bounced. If you didn't hit anything, you move forward a little farther and check again. You stop when you've reached the edge of your simulated vision (the horizon).
If you think that might take a while, consider the fact that you have to do this for every pixel on the screen. For an MID with a 128 x 128-pixel screen, that's 16,384 times per frame. Tracing that many rays even on a reasonably well endowed MID would give you a frame rate of something like 2,000. In other words, you can forget it. The technique is still a good one; you just need to tweak things a little.
The basic method of ray tracing works quite well for generating a presentable 3D image. The reason it's slow is the sheer number of rays being traced to create each frame. Therefore, it follows that the best way to speed up the process is to reduce this number as much as possible. If you think back to how you developed the tile engine, you might have noticed how you reduced complexity by reducing the granularity of the world with which you were dealing. Collision detection was a good example of this. Because you knew that tiles only existed at certain points in the world (every 16 pixels), you only needed to check those positions. The end result was that the number of checks you needed to perform was reduced by 16 times.
Have you caught on to what you're going to do yet? It's basically pretty simply. To increase the speed of ray tracing, you'll reduce the number of rays being traced. To do that, you'll use a simplified form of ray tracing known as ray casting.
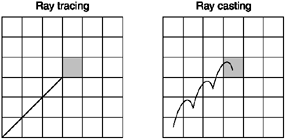
Essentially, ray casting is exactly the same as ray tracing except that you cast rays into the world instead of tracing them. You can think of this as something like using a fishing rod to cast to different points in the world. Instead of slowly tracing a line, you just dip in at the points that count. In terms of your tile engine, this means you can jump along in 16-pixel increments instead of one-pixel increments. In Figure 21.2 you can see an example of a ray being traced into a map to determine if and when it will collide with a tile. In the first case, ray tracing is used to check in one world-unit increments, whereas in the second case you jump in larger (tile-sized) increments. The resulting difference in speed is obvious: To strike the wall (the black tile) in this map with tracing could require hundreds of checks, whereas ray casting would require only three tests.
Figure 21.2. Ray casting involves tracing rays only at points where an object can exist.
Like with a 2D tile engine, the use of ray casting limits you to placing objects in the world at set cell boundaries (tiles). It is possible to add objects (actors) that can move around freely; however, as with a tile engine, these are handled as a separate layer using fixed-perspective sprites (rather than 3D-rendered ones). Don't worry; you'll get to all that stuff after you finish your basic rendering engine.
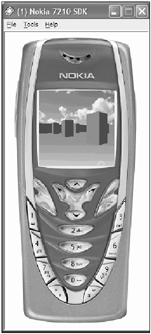
Using ray casting (and a few other tricks you'll look at along the way), it's possible to create a very high-performance, cool 3D world effecteven with the limited power of an average MID. Figure 21.3 shows the end product.
Figure 21.3. The J2ME ray-casting engine developed in this chapter
All right, enough theory; you want to know exactly how to make this thing work. Ready to take a ride?