The Fundamentals
To build your ray-casting engine, you need to cover a few basic things first. Once you have all this in place you'll find the actual engine code to be much simpler.
The Map
Ray casting involves projecting rays into a representation of your world and determining if and where something was hit. The question is, what exactly are you hitting? The answer is basically the same as in any 2D tile engine game: You need an array representing all the tiles in your world. Then when you cast rays, you'll check against this array to determine whether a particular world location contains a wall.
The code to create the map array is the same as you've seen before. You'll use the familiar World class to encapsulate all this.
NOTE
Note
For a complete example of a raycasting engine, refer to the Chapter 21 source code directory on the CD.
public class World
{
    public static final int TILE_WIDTH=32;
    public static final int TILE_HEIGHT=32;
    private int tilesWide = 20;
    private int tilesHigh = 20;
    private byte[][] tileMap;

    ...
To give you somewhere to play around, you can simply add border walls and a grid of pillars. I've added this into the World class constructor.
// set up the map
tileMap = new byte[20][20];

// side walls
for (int tx=0; tx < 20; tx++)
{
    tileMap[0][tx] = 1;
    tileMap[19][tx] = 1;
}

// top and bottom walls
for (int ty=0; ty < 20; ty++)
{
    tileMap[ty][0] = 1;
    tileMap[ty][19] = 1;
}
// pillars every four tiles
for (int ty=0; ty < 20; ty+=4)
    for (int tx=0; tx < 20; tx+=4)
        tileMap[ty][tx] = 1;
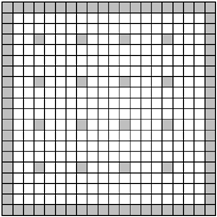
Figure 21.4 shows the resulting tile map.
Figure 21.4. A grid of tiles used to represent the world
Field-of-View
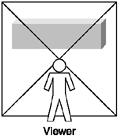
Your ray-casting engine will present a view as though the player was looking into the world directly through the screen (known as a first-person perspective). Two-dimensional games in which you see the player's object (such as a ship) use a third-person perspective. Figure 21.5 illustrates the first-person perspective (ignore the man in the front, that's just to illustrate where the view is coming from).
Figure 21.5. Ray casting presents an image of the world in a first-person perspective.
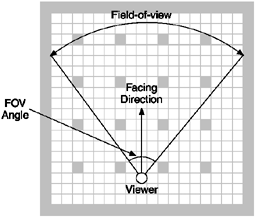
The next thing you need to determine is exactly which rays to project and at what angles. If you picture yourself standing in the world you described earlier (the grid) and looking out across the tile map, you'll only be able to see a limited area based on the direction you're facing (unless you have eyes in the back of your head). The range of vision is known as your field-of-view (FOV). Your eyes have a natural FOV of around 100 degrees; however, due to the limits of the screen, an angle of about 60 degrees works best. Feel free to play around with different values to see the effects. (Setting the FOV to 360 is quite an experience.)
As you can see in Figure 21.6, if you project from the viewer's current point out into the tile map, you can determine what is within view based on the FOV.
Figure 21.6. The field-of-view (FOV) represents the range of your virtual player's vision.
Casting Columns
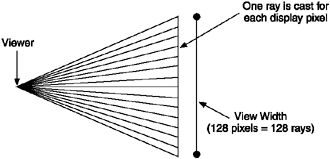
So now you know what your field-of-view is, and you're probably wondering how this relates to the final image being displayed. For your simplified engine, you'll only draw something if a ray hits a populated tile. Because you're dealing with a 2D world, you only need to cast a single ray for each vertical screen column. This is an important concept to understand: You cast a ray for every vertical pixel line across the screen, not every pixel on the screen. You can see this in Figure 21.7; for every pixel wide you would cast a ray. These are known as casting columns.
Figure 21.7. For each pixel across the screen you cast a corresponding ray into your world.
As each of these rays is cast, you check to see whether it hits anything. If it does, you can draw a vertical line representing the wall you struck. The position and size of the wall is based on distance the ray traveled. You can see the results in Figure 21.8. (I've added gaps to separate the rays visually.)
Figure 21.8. You cast a ray for each vertical column. If a wall is struck, you draw a line based on the distance the ray went.

You've just seen essentially the core of a ray-casting engine. For every column, cast a ray, determine whether you hit something, and then draw a vertical bar based on the distance you went. Think about this for a second; it's the key to understanding how all this works.
One other thing you need to do is determine the number of degrees per casting column. On your reference MID you would have 128 casting columns (one for each pixel across), so you can simply take the angle and divide it by the number of columns, right? Well there's a slight catch. Because you have a set number of pixels across, you need to round things out to make sure you go completely across the screen. For example:
columnsPerDegree = viewWidth / fov;  // 128 / 60 = 2.13 (rounded down to 2)
fovColumns = viewWidth / columnsPerDegree;  // 128 / 2 = 64 columns
halfFovColumns = fovColumns / 2;
The final variable, fovColumns, is the total number of casting columns you'll use. Notice you'll actually be drawing 64 degrees of view, rather than 60. halfFovColumns is something you'll need often later, so you pre-calculate it here to save time.
Focal Distance
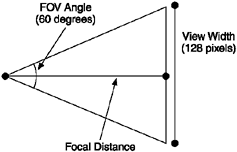
Next you need to calculate the focal distance (also known as the focal length), which determines the distance between the viewer and the point of focus. For your purposes this is a somewhat arbitrary figure used to scale the size of objects.
To calculate the focal distance you use the FOV and the width of the final view image. Note that you're not using the height because you're dealing only with a 2D world map. (I'll get to more on this in a little while.)
Using the basic Nokia Series 40 MID, you would have a screen width of 128 pixels. You've already decided to use an FOV of 60 degrees. Now, based on these two values, figure out the distance between the projection plane and the viewer.
If you look carefully at Figure 21.9, you can see it's actually two right triangles. If you split it in half you can use basic trig to calculate your value. Because you only know the opposite side, which is the view width divided by 2 (64), and the angle, you need to use TAN to determine the adjacent (the distance). Let me explain this a little moreI just know you're dying to do some trig.
Figure 21.9. You determine the focal distance (used for scaling) using the viewing width and FOV.
In Figure 21.10 you can see the triangle from Figure 21.9 separated out. I've also added trig labels to make this clearer.
Figure 21.10. The focal distance triangle. (Note that the width and FOV must be divided by 2.)
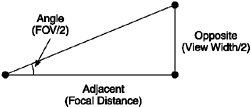
If you recall math class, you know that:
TAN(angle) = opposite / adjacent
Therefore, it follows that:
adjacent = opposite / TAN(angle)
It's pretty easy from this point; you simply fill in the values. The resulting code to determine your focal distance is
int focalDistance = (viewWidth/2) / TAN(FOV /2);
Just for your interest, the focal distance for your example MID, using an FOV of 64 degrees and a view width of 128 pixels, would be 64 / TAN(32),or around 110.
Here's the actual code for the World class you'll use; basically, it's the same except for the use of MathFP to handle the floating-point values.
int distFP = MathFP.div( MathFP.toFP(viewWidth/2),
              MathFP.tan(Actor.getRadiansFPFromAngle(32)) );
focalDistance = MathFP.toInt(distFP);
In case you're wondering, the getRadiansFPFromAngle is a static Actor class method to convert degrees to radians.
public static final int FP_PI2 = MathFP.mul(MathFP.PI, MathFP.toFP(2));
public static final int FP_DEGREES_PER_RAD = MathFP.div(MathFP.toFP(360), FP_PI2);
public final static int getRadiansFPFromAngle(int angle)
{
    return MathFP.div(MathFP.toFP(angle), FP_DEGREES_PER_RAD);
}
Faster Math
Before you get into the actual engine, you need to add some general code to speed up these trigonometry calculations. Here's the World class code to create an array of lookup values corresponding to all 360 degrees:
// lookup table for trig values (0 to 359)
public static int[] lookupCosFP = new int[360];
public static int[] lookupSinFP = new int[360];
public static int[] lookupTanFP = new int[360];

// static init
{
    for (int i = 0; i < 360; i++)
    {
        // build an array of pre-calculated trig values (much faster to just
        // look them up here). note we add 0.01 to avoid all divide by zero
        // cases.
        lookupCosFP[i] = MathFP.cos(MathFP.add(MathFP.toFP("0.01"),
                                     Actor.getRadiansFPFromAngle(i)));
        lookupSinFP[i] = MathFP.sin(MathFP.add(MathFP.toFP("0.01"),
                                     Actor.getRadiansFPFromAngle(i)));
        lookupTanFP[i] = MathFP.tan(MathFP.add(MathFP.toFP("0.01"),
                                     Actor.getRadiansFPFromAngle(i)));
    }
}
Notice I'm adding a small degree to each value; this is just a cheap way to avoid divide-by-zero problems later. The increment doesn't really affect the results, and you don't need to worry about catching all divide-by-zero cases (of which there are plenty).